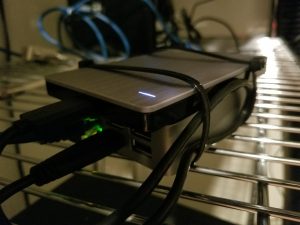
Raspberry Pi 4B storage performance

In case it wasn’t apparent, I’m into storage. Also, I’ve been interested in how a raspberry pi SBC can handle running a performance hungry distributed storage platform like Ceph.

When the RPI4 was announced, I was disappointed in the lack of NVMe/PCIe connectivity. However, one thing I found quite interesting was the massively improved USB performance and introduction of USB3 ports, using a direct PCIe interface to the SOC. It was enough to make me order one as early as possible to run some tests. I haven’t seen much out there that looks at the Raspberry Pi as a “storage node”. But TomsHardware did have an interesting set of results using a USB->NVMe adapter. Most of the metrics don’t apply to my use case, but there were some synthetic IOZone numbers showing a huge increase in performance. I wanted to go a bit further, looking at latency and sequential and random performance.

Thinking about building a Ceph cluster of small single-board computers, I had thought that NVMe (m.2 pcie) storage was a must. It seems quite silly to burden a small computer with the translation from the CPU to USB, USB to SATA, and SATA to Flash by connecting a SATA SSD.

However, I’m a firm believer in good-enough is good-enough. Right now an SBC with NVMe would be something like a RockPi4. And while it looks great, it doesn’t have the community and volume shipments of the Raspberry Pi.

With what I had on hand already, heres’ the test I put together:

  • A RPi3B+ in a ArgonOne case
  • A RPi4B Sitting on a cardboard box (no cooling) because I don’t have the new ArgonOne Case for it yet.
  • A StarTech USB3->SATA3 Adapter I had lying around
  • A 240GB Intel SSD730 with many years of use in a server
  • Buster-based Raspbian (latest) with FIO 3.12

In short, the performance is awesome! Here’s some graphs.

Raspberry Pi 3B+

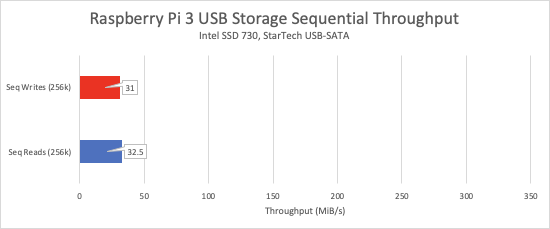
First, the sad stuff. The Raspberry Pi 3B+ USB2.0 interface appears to limit performance quite a bit. USB 2.0 should be 480Mbps but for some reason I see only about exactly half that.

The RPi3b+ is pretty slow.

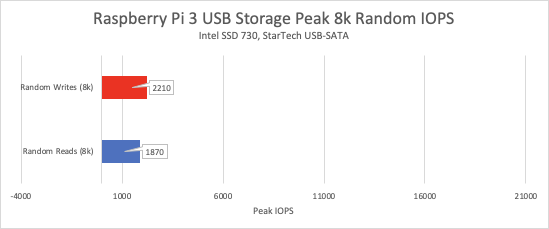
Maximum random read/write IOPS are similarly pretty depressing. I noticed the CPU was about 70% idle during these tests, and quite a lot of time on IOWait. So I guess most of the latency is in handling and processing the smaller transaction sizes for the random IO’s to the USB->SATA controller.

While much better than a HDD, this isn’t any way for a SSD to live.

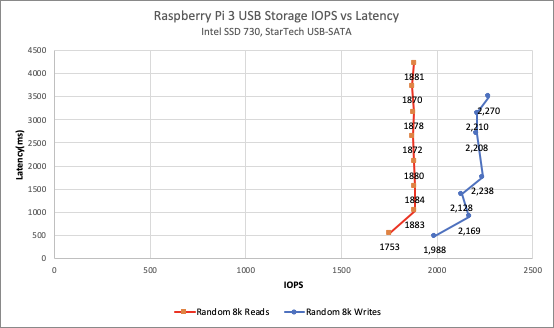
When looking at using a piece of hardware for storage use cases, it can be interesting to measure how latency and IO’s per second are related. By increasing the amount of workload, and measuring the maximum amount of IO’s and Latency at the same time, we can tell a few things about the limits of the system. In this case, it shows that no matter how many simultaneous operations are being sent to the storage, they all get in line and wait their turn. This tells you that there’s a bottleneck of a single queue, processing transactions headed to the storage.

Ok, enough of the sadness. Let’s see if the new Raspberry Pi 4B can be a viable fast SBC-based storage node. Note that I’ve kept the scale in the bar graphs the same, so you can visualize how much of an improvement there is.

Raspberry Pi 4B

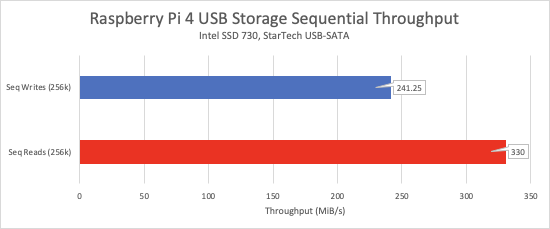
First off, sequential throughput. Keep in mind, this is the same SSD connected via the same USB interface plugged into one of the USB3.0 Ports on the Raspberry Pi 4B. CPU Idle % was higher here in all tests, over 80%. Nearly 10x better storage throughput!

SSD Writes and Reads exceed the network port capability by 2x or more

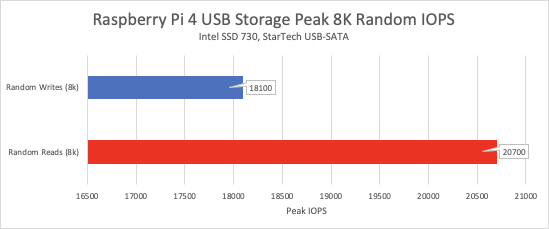
Next we have random read & write IOPS. Again we can see almost a 10x increase. This is fantastic. Keep in mind here, that the network port (1Gb) is only going to be able to transfer at most 16k 8K IO’s per second, and as a ‘storage node’ every transaction will be coming through the network to the disk.

Good random read/write performance from the Raspberry Pi 4B.

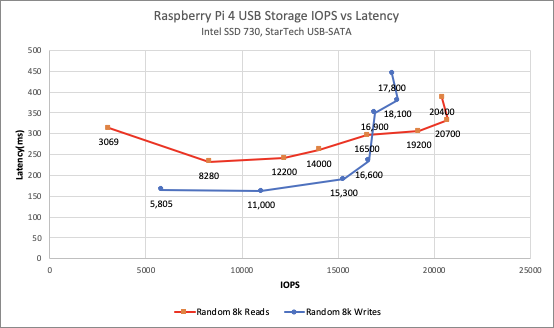
Finally, here’s the latency vs IOPS graph. We can see that as we increase the queue depth sent to the USB->SATA bridge, we do see performance improvements up to a point. The graph above shows the best performance at the “knee” of the latency/IOPS curve. I’ll admit that these latency numbers aren’t that impressive compared to any low end PC with a PCIe M.2. device. But I believe they’re still quite usable for a storage node in a super-cheap distributed flash cluster.

Read vs Write latency and IOPS at increasing queue depths

Summary

Overall, I think this shows that the Raspberry Pi 4B has some good potential uses as a small storage node. When used as a Flash-based storage node, you could imagine that a small stack of these could provide a high performance (compared to HDD) feature-rich storage cluster.

Instead of flash, if you consider attaching an SATA HDD to the USB->SATA adapter, there’s no question that this platform has more than enough horsepower to occupy any modern nearline HDD. And when you consider that 4GB is now available for the RPi, which happens to be the default memory requirement for a single Ceph OSD, it should be able to cache a decent amount of IO from the disk.

Personally, I want to cobble together 3 or 4 of these raspberry pi’s in some decent (Active cooled) case, and then attach them each to the cheapest $/TB SATA SSD’s I can find. I’d love to see what a small cluster of these could do as central storage for various VM’s or containers of my other projects. As a bonus, Ceph Luminous seems to be standard and operational in the latest Raspbian. Stay tuned if I manage to pull the trigger on this project!

Quick thoughts on a parts list:

So $25 for the power plus $100 per raspberry pi node, and then just add your disks. I’ve seen plenty of 1TB/$100 Sata SSD’s as of late, so a 4-node setup could be had for $825 or so. That’d be 3TB (EC3+1) of usable distributed flash storage.

Ceph Luminous on a Raspberry Pi 3B

I recently decided to poke around and see how difficult it was to install Ceph on a Raspberry Pi. While it has been done a bunch of times before, I wanted to see how the latest and greatest (Spring 2019-ish) code worked, and how much effort was required. The great news is that it’s almost turn-key at this point using an arm64 debian distribution. The luminous ceph packages are available and they work!

It’s not fast by any stretch, primarily because of the network-to-USB-attached-disk contention within the RPi . But it does work. Longer term, memory consumption is an issue . But I’ve let it idle for over a week and heartbeats/scrubs seem to run ok.

This whole setup becomes far more interesting when you consider it applied to one of the RPi alternatives, some of which have PCIe NVMe slots, and much faster networking and CPU. Especially when you consider the price trajectory of NVMe TLC and QLC storage devices!

I’m mostly just pasting the commands from my shell history here so I can use them another time.

Cookbook-level instructions

First, get the “Buster” beta for the raspberry pi and write it to an SD card. More info: https://itsfoss.com/debian-raspberry-pi/

As Root:


# Initial installation of packages not installed by default with Debian arm64 buster
 apt-get upgrade
 apt-get update
 apt-get update
 apt-get install lvm2 sudo gnupg gnupg2 gnupg1 lsb-base lsb-release

# Setup the ceph repo and add some more packages
 wget -q -O- 'https://download.ceph.com/keys/release.asc' |  apt-key add -
 echo deb https://download.ceph.com/debian/ $(lsb_release -sc) main | sudo tee /etc/apt/sources.list.d/ceph.list
 echo $?
 apt clean
 apt-get  update
 apt-get install ceph-deploy
 adduser ceph-deploy
 echo "ceph-deploy ALL = (root) NOPASSWD:ALL" | sudo tee /etc/sudoers.d/ceph-deploy

# /dev/sda is a USB attached SSD... I set it up with 4 partitions to do 4 OSDs
 fdisk /dev/sda
# had to reboot, kernel wouldn't see new partition table otherwise
 shutdown -r now

# For some reason, the distribution installed by ceph-deploy with the armhf repo setup above didn't install the ceph-volume systemd service.
 cd /lib/systemd/system/
 wget https://raw.githubusercontent.com/ceph/ceph/master/systemd/ceph-volume%40.service

As user ceph-deploy:


# Setup public key ssh access (to ourselves)
# Server is called 3pio in DNS.
 ssh-keygen
 ssh 3pio
 ssh-copy-id ceph-deploy@3pio
 ssh 3pio


# Use ceph-deploy to create a cluster (and install ceph software)
 mkdir testcluster
 cd tescluster
 ceph-deploy new 3pio
 vim ceph.conf
 ceph-deploy install --release luminous --no-adjust-repos 3pio
 ceph-deploy mon create-initial

# For some reason ceph-deploy doesn't copy the keyrings to /etc/ceph so I did this manually.
 sudo cp *keyring* /etc/ceph     sudo chmod o+rx /etc/ceph/*
 ceph-deploy osd create 3pio --data /dev/sda1
 ceph-deploy osd create 3pio --data /dev/sda2
 ceph-deploy osd create 3pio --data /dev/sda3
 ceph-deploy osd create 3pio --data /dev/sda4
 ceph-deploy admin 3pio
 ceph-deploy mgr create 3pio

# Ceph should be up, check it out and do a few things
 ceph -s
 ceph osd tree
 ceph osd pool create testpool 512  512 replicated 0
 ceph -s
 rados bench 15 write -p testpool -b 524288
 ceph -s
 ceph df
 ceph osd df

All done!

root@3pio:/home/pi# ceph -s
  cluster:
    id:     b6623e8d-a8f8-455f-83ca-1b49752c2a1e
    health: HEALTH_WARN
            application not enabled on 1 pool(s)

  services:
    mon: 1 daemons, quorum 3pio
    mgr: 3pio(active)
    osd: 4 osds: 4 up, 4 in

  data:
    pools:   1 pools, 128 pgs
    objects: 1.77k objects, 885MiB
    usage:   5.77GiB used, 194GiB / 200GiB avail
    pgs:     128 active+clean

Software defined radio with Raspberry Pi (Part2)

In my previous post, I described how I stumbled into RTL-SDR and connecting it to a Raspberry Pi.  It wasn’t working well for me due to network lag, hiccups, and sample rate limitations.  I didn’t want to give up, and the code looked like it could be improved.   This post describes some of the changes and the results.

The goal

The goals I had were to:

  • Move the RTL-SDR dongle to a raspberry pi connection in a closet, far away from my desktop with the GQRX software & GUI.
  • Utilize as much of the bandwidth of the RTL-SDR dongle as possible.
  • Hopefully enable all of this over wifi, because an ethernet cable limits the placement of the antenna/pi, and the PiZeroW doesn’t even have an ethernet interface.

What I changed

From the source, rtl_tcp.c uses two threads.  One receives a call-back from the RTL-SDR library any time there is new data from the USB dongle.  The other thread is supposed to take any new data and write it to the TCP socket so the kernel can transmit this data over the network to GQRX (or whatever client).

I decided to rip out the semaphore between the TCP and USB threads — remove all locking.  I also removed the linked list structure and allocation / deallocation entirely, so that none of this code would have to call malloc() or free() in the performance path. .  I replaced these with a single statically allocated circular buffer.  Both threads would interact with the data through a non-blocking polled-mode interface.   The USB-reader thread writes data into the circular buffer at head, and the TCP worker reads/transmits data from the same circular buffer at tail.   Neither thread touches the same variables, they only each update head or tail themselves.

The USB Worker:

 if ((ringbuf_head+len) < (unsigned int)ringbuf_sz)
 {
      memcpy(((unsigned char*)(ringbuf+ringbuf_head)), buf, len);
 }
 else
 {
      memcpy(((unsigned char*)ringbuf+ringbuf_head), buf, ringbuf_sz-ringbuf_head);
      memcpy((unsigned char*)ringbuf, buf+(ringbuf_sz-ringbuf_head), len-(ringbuf_sz-ringbuf_head));
 }
 ringbuf_head = (ringbuf_head + len) % ringbuf_sz;

The TCP Worker:

 unsigned int sendchunk;
 if (ringbuf_tail < ringbuf_head)
     sendchunk = ringbuf_head - ringbuf_tail;
 else
     sendchunk = ringbuf_sz - ringbuf_tail;
 bytessent = send(s, (unsigned char*)(ringbuf+ringbuf_tail), sendchunk, 0);
 bytesleft -= bytessent;
 ringbuf_tail = (ringbuf_tail + bytessent) % ringbuf_sz;

With these changes, both threads are free to run as fast as they can.  Ideally, the network can keep up with the USB data stream coming in.  So the TCP worker thread should be reading data just behind the USB thread for the lowest latency.   If there is a ‘hiccup’ and the TCP thread doesn’t get to run, or blocks for some reason, then the amount of data not yet transmitted in the buffer will grow.

In the worst case, so much data is in the buffer that the USB worker thread runs into the “tail” and cannot write any new data.  I decided in this case to trim the buffer, and move the tail ahead.  This would result in the oldest data being lost.  But this is real-time information and I figured it was better to stay current than introduce a lag that could never go away.

The results

The performance improvement was tremendous!   Ditching ethernet, the Raspberry Pi 3B+ was able to do the maximum bandwidth of the RTL-SDR at 3.2Million samples per second, even over wifi.  This is a sustained 53Mbps over wifi, not bad.   Even at this maximum value allowed by GQRX, the lag is never more than one data chunk from the USB.  If there’s an occasional blip on raspberry pi that pre-empts the TCP sender, it quickly recovers and never gets more than 2-3 chunks behind.   Changing channels is now instantaneous even at the highest bitrate.  And switching to Wifi means that I can simply stick the Raspberry pi to the antenna assembly and place it anywhere for the best reception!

I also tried it with a Raspberry Pi Zero W.  I was immediately able to jump around frequencies with very little (1/4 second) lag at 1.9Million samples per second.  It was very stable, with about 4-6 data chunks in the circular buffer at any time.   I was not however able to extend beyond 1.9Msps.  When I did this, the Raspberry Pi Zero W CPU was overloaded and couldn’t keep up with the data rate.  But at a reasonable data rate, the lag is always zero.

Also, the “ll+ now (##)” messages are gone :). I replaced those with a 30-second update on the overall bitrate and the number of bytes that are inflight between the USB dongle and the TCP socket.

I did do some “stress testing” and reduced wifi reception or overloaded the Raspberry Pi Zero W.  Listening to FM radio was still “OK”, but every 10 seconds or so there was a “jump” when it would truncate the buffer.  The lag was at worst about 3 seconds with this design.  In the previous design, the lag would sometimes extend to 15+ seconds, which was so long you weren’t sure any change took effect or not.

Summary:

  • Raspberry Pi 3B+
    • Before: Could only support up to 1.92Msps over wifi with 1-2 seconds of lag.  Ethernet could do 2.4Msps.
    • After: Able to set the sample rate to the dongle maximum of 3.2Msps over wifi with instant channel changes.
  • Raspberry Pi Zero W
    • Before: Couldn’t get above 0.92 Msps, and the lag was often 5-10 seconds.  Not stable.
    • After: Able to achieve 1.92Msps with very good lag (feels like about a quarter second).

I really enjoyed jumping into “software defined radio on the cheap” and can’t wait to try out other extensions or applications that can use this data.  I’ve heard SDR# is a really good application, albeit closed source.  I just need to find a windows machine.  Given the improvement and the other people and blogs citing these issues, I will probably submit a PR soon with the changes in case it helps anyone else.

Update: I submitted a PR.  https://github.com/osmocom/rtl-sdr/pull/6

Software Defined Radio with Raspberry Pi (Part1)

I’d been looking for a reason to use another Raspberry Pi for some time.  For years I’ve had an old Oregon Scientific weather station that had 4 really nice 433mhz weather sensors, but I no longer used the weather station base.     I wanted to setup a raspberry pi that would somehow retrieve the temperature readings these old sensors transmitted, and have a script that would push them to an influxdb container for graphing.

First, I went cheap.  I bought a 433 ASK/OOK GPIO interfaced board  from amazon for 7 bucks. Of course this required another $25 in jumper wiring and connectors, and once I had it hooked up I immediately found that it couldn’t demodulate whatever protocol these sensors used.  It was primarily used for very very cheap temperature sensors, or short range signal communication between two embedded boards.

RTL-SDR

A while later, a friend of mine pointed me at an RTL-SDR USB dongle, and for $30 you can get a pretty nice kit which has antennas, the dongle, and a few mounts.  I purchased it and immediately plugged it into my Macbook and installed gqrx.

This resulted in instant gratification: a very cool graphical interface with a waterfall of the radio spectrum. I quickly forgot about the temperature sensors as I realized I could visually poke around anywhere in the spectrum. I could browse anything, from ATC traffic control frequencies, to DPS/FD VHF, Weather forecasts, and even listen to stereo FM radio.  Even better, a VERY robust software package, rtl_433,  is available that decodes the 433 temperature sensors, from demodulating the transmissions all the way through decoding the proprietary packets and displaying them neatly or formatting them in a useful json blob.  I’ll get back to doing that at some point.
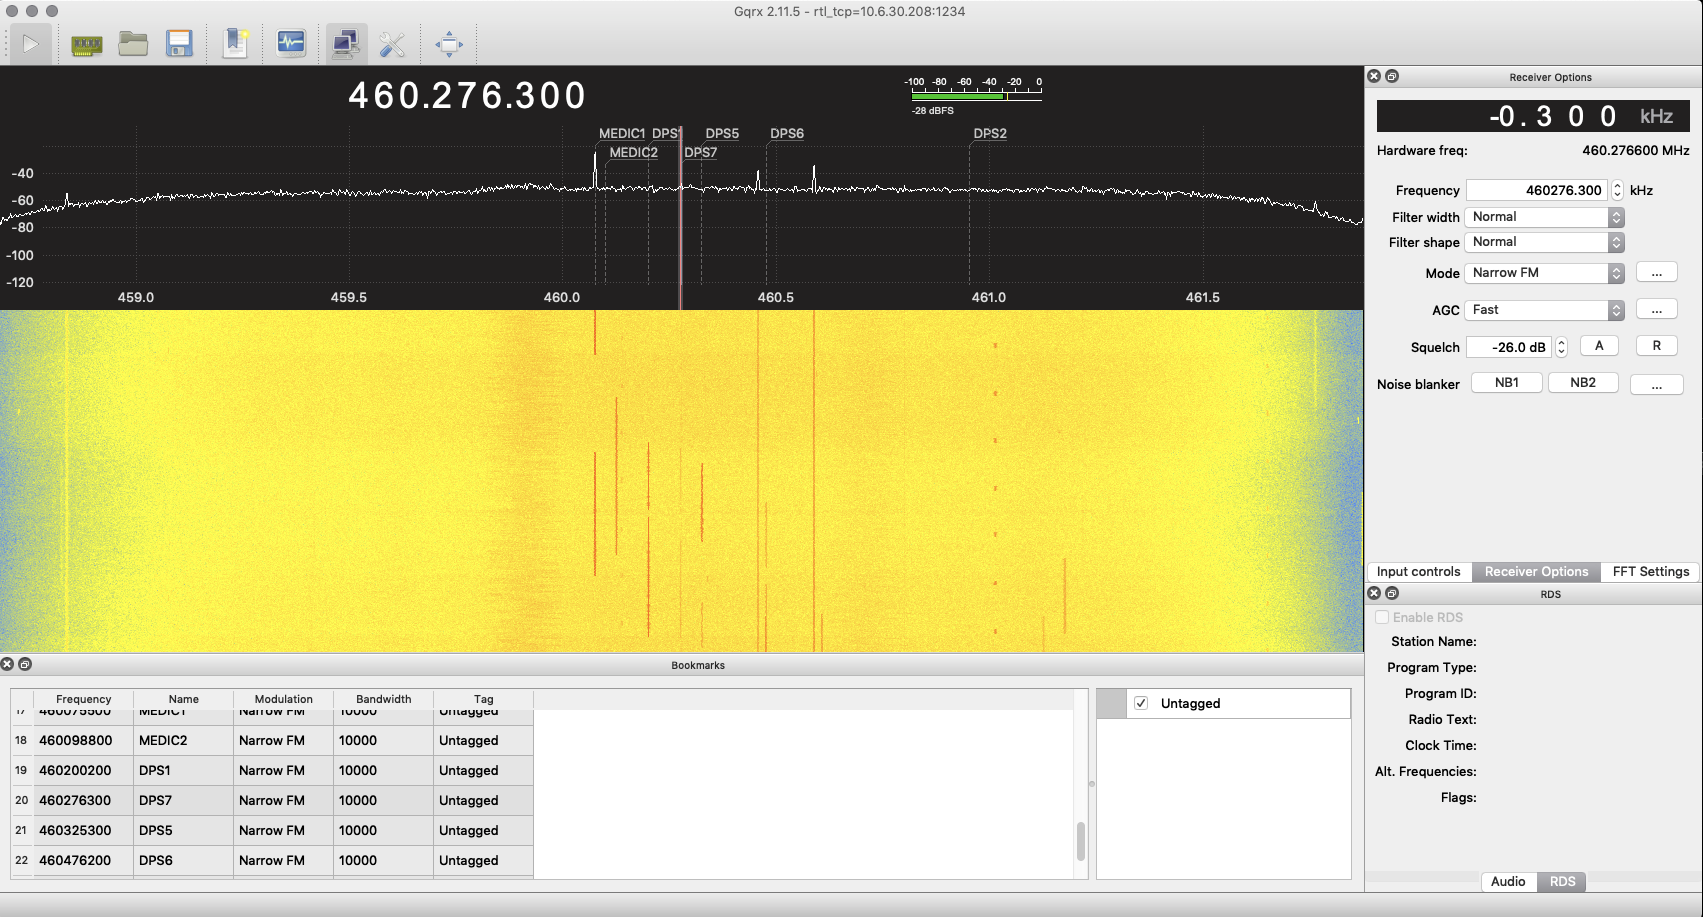
gqrxexample1

Enter the Raspberry Pi

I quickly realized that the computers and other junk on my desk weren’t helping my signal reception very well. I also didn’t like having the antennas everywhere.  I found that there’s a part of the rtl-sdr package called rtl_tcp which is perfect:  It simply provides the raw data output from the RTL-SDR USB dongle over a TCP connection.  GQRX already supports this as well.  You can put your antenna and dongle far away, preferably somewhere with the best reception, hook it up to a cheap raspberry pi, and still listen to everything on your desktop!  I was excited to try this with a raspberry pi.  I immediately imagined zip-tieing  a Raspberry Pi Zero W to the antenna mast and sticking it in a closet on the 2nd floor.

RTL-SDR is already an upstream package for Raspbian, so it’s as simple as sudo apt-get install rtl-sdr on your raspberry pi and off you go.

Not so fast! (literally)

I connected the dongle to an rpizerow I already had, installed RTL-SDR, and ran rtl_tcp.  I pointed gqrx to the IP of the raspberry pi (following an excellent guide such as: http://www.hagensieker.com/blog/page/?post_id=70&title=make-a-raspberry-pi-3-rtl-sdr-server ) and I was in business quickly.

Except, it wasn’t so usable. I couldn’t use the full bandwidth of the RTL-SDR dongle.  The lower the samples-per-second, the less of the spectrum you can see at once.  Even at one of the lowest bandwidths (0.92Msps) there was a few seconds lag between changing the frequency and seeing it in GQRX.  This was quite annoying, as GQRX doesn’t realize this, and so you get a few seconds of LOUD static if you’re changing modulation at the same time.  And it’s no fun to jump around frequencies.

And there wasn’t really any way to go above 1.15M samples per second.  When I had it directly connected to my laptop’s USB, GQRX was able to do 3.2M samples per second, and I could see a huge range of the radio spectrum, jumping around instantly.  But here, I had to limit the sample rate, reducing the range I could see at once and the quality of the signal.   Also, it wasn’t that stable. I saw a lot of these messages from rtl_tcp:

ll+, now 3
ll-, now 0
ll+, now 1
ll+, now 2
ll+, now 3
ll-, now 0
ll+, now 1
ll+, now 2
ll+, now 3
ll-, now 0
ll+, now 1
ll+, now 2
ll+, now 3
ll-, now 0
ll+, now 1
ll+, now 2

Sometimes this number grew and grew into the hundreds.  A quick google showed this meant the rtl_tcp program wasn’t able to send the data it had, and had to allocate more buffers.    This post outlines the problem, and explains that the data is stored in an ever growing linked list of data blobs read from the USB.

I immediately switched to a Raspberry Pi 3B+ and a wired ethernet connection.  I figured the Ethernet connection and 4 cores would solve it.  But it did not, even with a CPU usage of ~17% there was still significant lag above 1.92Msps.  This indicated that the threads of the program were not being scheduled and likely blocking on something.  I next experimented by increasing the MTU — which has the effect of decreasing the number of ACKs and TCP packets coming back to the Raspberry pi.  This actually helped reduce lag and the “ll+ spiral”, somewhat.  But I couldn’t increase the bandwidth to what I had with direct USB, and the raspberry pi wasn’t overloaded in network utilization or CPU utilization.

I decided to check out the source and found a few potential issues:

  • Each data chunk read via the USB was dropped into a newly allocated buffer
  • Every buffer only lived until it was transmitted over the TCP socket
  • All buffers were inserted and removed from a linked list.
  • There was a single lock between the thread reading data from the USB and transmitting data over the TCP socket.  Therefore, in some cases, the TCP thread could prevent the USB thread from executing and vice-versa.
  • Both threads could block/sleep and wait on a signal if there was lock contention.

The net result was a large amount of malloc/free heap overhead, as well as the bookkeeping required for the linked list element insertion and removal, and even worse,  threads would halt or go to sleep if the other thread had a lock.  This meant that when the TCP worker and USB-reader worker got “in phase” they could continually step on each other.   Also most importantly,  the design of this code was to simply grow the linked list of data blobs if it wasn’t able to push the data through from the USB to the network.  This meant that every “hiccup” put the data stream further behind “real-time”, increasing the “lag” I felt when changing frequencies.   This is the reason the author in the blog about raspberry pi as a rtl_tcp host remarks: “Note that tuning is a bit slow. But it works.

I’m sure this code performs quite well on a multi-core Intel Core i5 or other mainstream desktop CPU.  But the raspberry pi needs more finesse.  Having a raspberry pi in a closet with a well-placed antenna seemed like such a compelling use case for rtl_tcp.  And given the issues in the code, I felt there was a chance to improve it.

To be continued in part 2.
DIY Off-site encrypted backup with Raspberry Pi

While my day job often involves creating highly available enterprise storage products, I am more interested in building cheap solutions at home that can accomplish things only expensive products did a few years ago.  In this case, I need to backup all my personal files: financial, documents, family photos/videos, etc.   I’ve had few variants of this setup in the past, usually built on a PC or a laptop.  This time, I’m going to do it as tiny and low-cost as possible.

In general, if you want to backup some data, it’s probably important to you.  If it’s important, you want to make sure this backup copy doesn’t get lost also, if your main copy is lost.  Obviously, putting a copy on a USB drive and storing it in a shelf above your computer is not going to cut it.   A house break-in, fire, etc will knock out both copies.   At the same time, if your data is far away from you, it’s hard to control it.  A fire, or break-in could occur, or nefarious people could get to your data.

So I wanted something that is small, unassuming, can be stashed at another location such as another house, and was completely encrypted.   I want to make sure if I lose track of it, there’s basically no way to access the data, and it would be very difficult to even figure out what it had on it.

The hardware

rpibackup

I hit up amazon for the parts:  A Raspberry Pi 3, 32GB SDCard, Canakit power supply, a 2TB Laptop drive in a shiny aluminum case, and a very cool FLIRC matching aluminum case.   At the time, total cost was about $150.   The HDD is easily powered from the Raspberry Pi’s USB port, as long as you have a decent power-supply.   Stability is important, because if this thing locks up it’ll be hard to reboot it since it’ll be off site somewhere.

The Pi: https://www.amazon.com/gp/product/B01CMC50S0

A pretty backup drive: https://www.amazon.com/gp/product/B00FRHTTIA

A nice FLIRC Case: https://www.amazon.com/gp/product/B07349HT26

AC Adapter: https://www.amazon.com/gp/product/B00MARDJZ4

32GB SD Card: https://www.amazon.com/gp/product/B010Q57T02

The Software

For the OS, I went with the standard: Raspbian (Stretch).      As far as the rest of the software goes, the core components I used are:

RSnapshot: http://rsnapshot.org/

Tinc (VPN):  https://www.tinc-vpn.org/

CryptSetup/dm-crypt: https://gitlab.com/cryptsetup/cryptsetup/wikis/DMCrypt

Theory of operation

OK, so I didn’t write this as a cookbook or HowTo.  I also don’t want to be too specific about how it’s setup for security’s sake.  Essentially, the raspberry pi will boot, and phone home over VPN (tinc).  It doesn’t know how to unlock or mount the drive it has.   Once it has phoned home, I can then manually enter the encryption keys and mount the drive, which contains a set of scripts and keys for the backup to work.   It also has a set of scripts on the encrypted disk that can be used to setup and initialize a blank raspberry pi that is attached.  I’m assuming here the SDCard it runs can fail easily, or that the drive itself may be the only thing I can retrieve in the future.

In normal operation, everything is run on the raspberry pi itself.  If everything is mounted,  the backup process can run periodically and automatically, pulling all the data from various servers I have and storing it on the attached drive.  I could even have it backup data from various cloud providers. I don’t need to “push” data to the remote backup, it “pulls”.

This works great with rsnapshot, which as it pulls data uses rsync and hard links to keep multiple point-in-time copies of data.  This means I have a view of ALL my data today, yesterday, and every day for 14 days, as well as weeks and month snapshots.  The overall space utilization for my own uses is very low even with dozens of daily, weekly, monthly copies.   The reason is that my data doesn’t change much over time, I mostly add pictures and documents but I don’t rewrite things very often.

Summary

The end result is a tiny, low power, $150 2-Terabyte encrypted backup solution that can be placed just about anywhere there is internet connectivity.  It automatically backs up data on a set schedule, and can protect against either loss of my main computer, theft of the equipment, mistake in deleting the data, or other malicious attacks.  Alternatively, if it gets lost due to a similar situation at the remote site, no personal data is left out of my control.  The data itself, as well as the knowledge of how to run the backups, is entirely encrypted.  If the whole thing gets destroyed, it isn’t a huge loss either.  I’m assuming it’s far enough away that a house fire or theft won’t affect both sites at once.

This kind of feature set would have been very expensive less than ten years ago!   When you consider the cost of even the cheapest amazon backups (where you don’t have as much control over security and you pay monthly forever), it’s a great value.

Enterprise Storage – Who buys this stuff, and why?


If you follow just about any tech site that discusses storage, you’d be forgiven for thinking that pretty much everyone in the universe has moved to cloud storage.   The reality is many of the fortune 500 companies are still housing their own hardware in their own data centers, although nearly all of them have a plan or desire to adopt cloud infrastructure.

Regardless of what you think ‘cloud’ or ‘software defined’ means (which could be an entire post in itself), it is clear that there’s a significant amount of money being spent on “not cloud” storage:   big refrigerator-sized boxes that hold data.

Check this out:

Vendor 4Q15 Revenue(millions)
1. EMC $2,229.00
2. HPE $1,572.00
3. Dell* $920.70
3. IBM* $892.90
5. NetApp $650.90
ODM Direct $1,161.20
Others $2,951.50
All Vendors $10,378.10

Source: IDC Worldwide Quarterly Enterprise Storage Systems Tracker, March 11, 2016

Clearly $10B in a quarter, even if declining, is nothing to shake a stick at.  Why is all this investment still going into traditional external storage?

Usually when this question comes up one or more of the following are offered as an explanation (with some associated words):

Reliability:   “bullet proof”..  “data integrity”.. “end to end checking”

Availability:  “Five.. Six.. Seven 9’s up-time”.   “No SPOFs!”

Performance:  SPC-1, SPC2, TPC-c, TPC-e, “one million IOPS” (or more)

Serviceability:  “Zero downtime maintenance”  “Hotswap components”

Disaster Recovery: “Sync/Async replication”  “Site Failover Capability”

Just about every storage box sold in the upper price bands of the IDC external storage tracker has a significant amount of engineering towards features in these categories. Similarly, bloggers and analysts usually cite the security concerns of the cloud, or the budgetary challenges associated with moving from cap-ex to op-ex infrastructure costs.

All of this is of course accurate.  But in my opinion, the first reason businesses used external storage appliances (i.e. “disks in a box outside of the servers”) and continue to rely on them today: Server and Application scale-out.  In the earlier days of “enterprise storage”, the first big change was that the “disk drives” moved into a box outside the server, and applications began to scale across multiple servers.  Databases, web server clusters, virtual machine hyper-visor clusters were made possible by the fact that from any server, you could access the storage in one location and know it was the latest up to date copy of that data.   As information systems grew to be more complex, and applications flourished in this environment, the “Enterprise Storage” characteristics mentioned above became prevalent out of necessity.  Basically: once your data was all in one basket, that basket evolved via continual improvement in reliability, availability, performance, serviceability, and — because the data was becoming so important to the business — disaster recovery capabilities.

Cloud infrastructure promises to disrupt this paradigm, but when I hear about “moving” to the cloud, I always keep in mind that many of the applications with the highest value data today still depend on the hub-and-spoke idea for storage and clustering.

Of course cloud infrastructure providers can offer the same storage access semantics, but typically they don’t.  If you look at what you can buy on AWS, you can get all kinds of slow and fast block storage, but it just attaches to your instance.  If you want a shared pool of storage, that is usually object based or archive.  That kind of data has totally different access characteristics and rules.  It doesn’t support the bread-and-butter database workloads that still pull in the billions of revenue in on premises storage. So, cloud storage isn’t a slam dunk (yet).

What will change that?  Probably applications and data access methods will have to change before cloud service providers offer competing storage with the kind of characteristics for a traditional OLTP workload.  Indeed, the stuff that was ‘born’ on the cloud or has moved there has been non-traditional apps with different requirements.  For example, posting a photo to your wall, nobody cares if it doesn’t show up in their feed for 20 seconds.   That’s a different situation than say, credit card fraud detection.

There is a *huge* amount of opportunity in this space, and it’s an area I watch closely.

First Post…

Stephen Blinick   September 15, 2016   No Comments on First Post…

Hello! After 15 years of owning a domain name, I decided to finally put some new content up.   For nostalgic purposes, I’ve kept around this time-capsule  original 1999 site , which I created as a joke in college.

I hope to use this blog to categorize ideas around side projects I tend to do from time to time, or to organize thoughts on current interesting technology trends.

Along those lines, I highly doubt anyone will read this —  but if so, thank you!